alamise

Website URL:

debian 6 openvpn

  • October 6, 2012
  • Published in Openvpn

1:安装
apt-get install openvpn iptables

2:配置服务端

cp -R /usr/share/doc/openvpn/examples/easy-rsa /etc/openvpn
cd /etc/openvpn/easy-rsa/2.0
chmod +x vars
source ./vars
./clean-all

./build-ca
这一步,您一直回车就行,不要填密码,如果要求你回答Y还是N,选Y回车

./build-key-server server

./build-key client1
这2步也跟上面一样,一路回车和选择Y回车

./build-dh

3:配置转发
vi /etc/rc.local
添加以下语句,您只要替换“208.110.73.134”为您自己的ip就行
# add iptables rule for openvpn
iptables -t nat -A POSTROUTING -s 10.8.0.0/24 -o venet0 -j SNAT --to 208.110.73.134

4:增加服务器端conf文件
vi /etc/openvpn/openvpn.conf
增加如下内容
dev tun
proto tcp
port 1194

ca /etc/openvpn/easy-rsa/2.0/keys/ca.crt
cert /etc/openvpn/easy-rsa/2.0/keys/server.crt
key /etc/openvpn/easy-rsa/2.0/keys/server.key
dh /etc/openvpn/easy-rsa/2.0/keys/dh1024.pem

user nobody
group nogroup
server 10.8.0.0 255.255.255.0

persist-key
persist-tun

#status openvpn-status.log
#verb 3
client-to-client

push “redirect-gateway def1″
push “dhcp-option DNS 69.197.153.253″
push “dhcp-option DNS 69.30.192.15″

comp-lzo

ok,启动openvpn服务
/etc/init.d/openvpn start
nohup /etc/rc.local &

5:客户端安装配置
http://openvpn.net/index.php/open-source/downloads.html 下载winodws客户端
安装后,然后从服务器把以下3个文件拷贝到windows安装路径下的config目录
这3个文件分别是
/etc/openvpn/easy-rsa/2.0/keys/ca.crt
/etc/openvpn/easy-rsa/2.0/keys/client1.crt
/etc/openvpn/easy-rsa/2.0/keys/client1.key

6:增加客户端配置文件
在config增加一个配置文件,文件名为client.ovpn
内容如下:
client
dev tun
proto tcp

# The hostname/IP and port of the server.
# CHANGE THIS TO YOUR VPS IP ADDRESS
remote 208.110.73.134 1194

resolv-retry infinite
nobind

persist-key
persist-tun

ca ca.crt
cert client1.crt
key client1.key

comp-lzo
verb 3


File excerpt:/etc/sysctl.conf

net.ipv4.ip_forward=1

Issue the following command to set this variable for the current session:

echo 1 > /proc/sys/net/ipv4/ip_forward

    debian 6 install webmin

    • October 6, 2012
    • Published in Debian


    运行  apt-get -f install


    /etc/apt/sources.list

    deb http://ftp.fr.debian.org/debian/ squeeze main
    deb http://ftp.fr.debian.org/debian/ squeeze-updates main
    deb http://security.debian.org/ squeeze/updates main
    deb http://download.webmin.com/download/repository sarge contrib
    deb http://webmin.mirror.somersettechsolutions.co.uk/repository sarge contrib


    If you like to install and update Webmin via APT, edit the /etc/apt/sources.list file on your system and add the lines :


    deb http://download.webmin.com/download/repository sarge contrib
    deb http://webmin.mirror.somersettechsolutions.co.uk/repository sarge contrib


    You should also fetch and install my GPG key with which the repository is signed, with the commands :
    cd /root
    wget http://www.webmin.com/jcameron-key.asc
    apt-key add jcameron-key.asc


    You will now be able to install with the commands :
    apt-get update
    apt-get install webmin
    All dependencies should be resolved automatically.

      x79-ud5

      • September 27, 2012
      • Published in 主板

      用2.09打开BIOS,

      厂商选:其他;

      SLIC:选择你喜欢的;

      SLP:选择你喜欢的(可以与SLIC相同也可以不同品牌);

      RW空着;

      验证:空着;

      工具自动选择“模块法”,点执行,OK!

        User Stylesheet css for chrome

        • September 26, 2012
        • Published in Chrome


        C:\Users\YOUR USER NAME\AppData\Local\Google\Chrome\User Data\Default\User StyleSheets


        add


        html:not(.disable_user_stylesheet) a:visited {color: red;}
        

          Running Your Own Application at Startup

          • September 26, 2012
          • Published in Qnap

          Method 1

          1. Log into your QNAP device using SSH or Telnet, for instance by using Putty
          2. Optional: install nano; use ipkg install nano & edit with nano instead of vi
          3. TS-201: Mount the config ramblock /dev/mtdblock4:
            # mount -t ext2 /dev/mtdblock4 /tmp/config 
          4. TS-109, TS-109P, TS-110, TS-119, TS-209, TS-209P, TS-219, TS-409 (Marvell ARM), TS-419P: Mount the config ramblock /dev/mtdblock5:
            # mount -t ext2 /dev/mtdblock5 /tmp/config
          5. TS-439, TS-509, TS-639, TS-809, TS-809U (x86): Mount the config ramblock /dev/sdx6:
            # mount -t ext2 /dev/sdx6 /tmp/config
          6. Create/Edit /tmp/config/autorun.sh .
            1. either using vi:
              # vi /tmp/config/autorun.sh
              1. Get vi editor into edit mode: press a
              2. Edit whatever you need to
              3. Exit edit mode: press ESC
              4. Save and exit: press ZZ
            2. or editing it using a desktop PC and e.g. SFTP
          7. Ensure that /tmp/config/autorun.sh is executable:
            # chmod +x /tmp/config/autorun.sh
          8. IMPORTANT: Unmount the mounted flash partition:
            # umount /tmp/config

            Installing offline bundles in ESXi 5


            ftp://ftp.hp.com/pub/softlib2/software1/pubsw-windows/p

            2144920481/v67792/hp-esxi5.0uX-bundle-1.1-37.zip


            So I ran into a situation where I needed to get the HP CIM providers onto ESXi 5 in order to gain more visibility into the hardware that was running my ESXi 5 install.  This is a relatively easy task but I thought I would throw the process I used up here anyways in the case that it might help others.  This should apply to other vendors who package their CIM providers as well however for this case I will use the HP Offline Bundle for ESXi as an example.

            First off, there are a couple of different ways you can do this.  Using the vSphere CLI or utilizing vSphere Update Manager.  I initially used the CLI method as I only had one host to do, but for these purposes I will explain both ways.  The Update Manager process will most certainly  help if you need to deploy these packages to more than one host.  Either way, you end up with the same results.

            So to start obtain the HP ESXi Offline Bundle from HP's website.  Simply find your model of server and it should be listed in the Drivers and Software section under VMware vSphere 5.

            Using the CLI

            First off you will need to copy the bundle from HP locally onto the ESXi server.  There are a few ways to do this.  You can utilize a program such as WinSCP to connect and transfer the file (you will need to enable SSH on the host) or you could simply upload this to a datastore that the host has access to using the Datastore Browser.  Either or, just get it on the host.

            Once it's on the host it's a matter of using Putty to ssh into your host or connecting directly to the DCUI and launching the ESXi Shell and running the following command…

            esxcli software vib install -d path_to_bundle.zip

            If you are using a remote CLI installation then you need to add a few options to provide the server and credentials as follows

            esxcli -s SERVERNAME -u root -p Password software vib install -d path_to_bundle.zip

            Once this command executes it should delve into the zip file and install the packages that are applicable to your host.  Once completed you will need to reboot your host.

            Using VMware vSphere Update Manager

            Using Update Manager takes a little longer to setup but will save you time in the long run if you need to apply a package or patch on a large scale.  The process to getting the bundles on your hosts is two-fold.  First we need to update the patch and create a baseline and then simply attach that baseline, scan, and remediate our host just as we always have for the standard ESXi patches.

            So first off we need to be in the Administration View of Update Manager.  This can be accessed by either clicking the 'Update manager' icon under the Solutions and Appliances section of the Home screen or by selecting 'Admin View' while on the Update Manager tab.  Once in Admin View we have a couple of tasks to perform; we need to upload our new patch and then create a baseline containing it.

            Navigate to the Patch Repository tab and click 'Import Patches' in the top right corner.  The remainder of this process is quite simple.  Browse to the zip file containing the patches and upload the file.  Once uploaded you should see your patch in the list (it will be bolded).
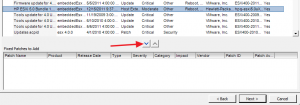
            Now we need to navigate to the Baselines and Groups tab to create our baseline.  Right-click in some white space on the Baselines and Groups tab and select 'New Baseline'.  Give your baseline a name and a description and select 'Host Patch' as the Baseline Type.  On the next screen we are going to want to select 'Fixed' as our Patch Option as this baseline is only going to contain one patch and it is never going to change.  Now we should be on the step where we need to select our patches to add to the baseline.  Find your newly uploaded patch and click the down arrow to add it to the baseline.  Once completed click 'Finish'.

            So now that we have a baseline created containing our patch that we want installed, the process of getting it on to the hosts should be quite familiar if you are using Update Manager in your environment.  Simply attach your new baseline to the host, Scan it, and Remediate.


            google hp-esxi5.0uX-bundle

            http://h20000.www2.hp.com/bizsupport/TechSupport/SoftwareDescription.jsp?lang=en&;;cc=us&prodTypeId=15351&prodSeriesId=4091412

            &prodNameId=4091432&swEnvOID=4115&swLang=8&mode=2&taskId=135&swItem=MTX-bd57017082334cdf81684ab39d


              Subscribe to this RSS feed
              Notice: Undefined offset: 1 in /var/www/vhosts/shan.info/httpdocs/templates/gk_publisher/html/pagination.php on line 18

              Notice: Undefined offset: 1 in /var/www/vhosts/shan.info/httpdocs/templates/gk_publisher/html/pagination.php on line 34

              Notice: Undefined offset: 2 in /var/www/vhosts/shan.info/httpdocs/templates/gk_publisher/html/pagination.php on line 34

              Notice: Undefined offset: 3 in /var/www/vhosts/shan.info/httpdocs/templates/gk_publisher/html/pagination.php on line 34

              Warning: count(): Parameter must be an array or an object that implements Countable in /var/www/vhosts/shan.info/httpdocs/templates/gk_publisher/html/com_k2/templates/default/user.php on line 145

              Notice: Undefined offset: 1 in /var/www/vhosts/shan.info/httpdocs/templates/gk_publisher/html/pagination.php on line 18

              Notice: Undefined offset: 1 in /var/www/vhosts/shan.info/httpdocs/templates/gk_publisher/html/pagination.php on line 34

              Notice: Undefined offset: 2 in /var/www/vhosts/shan.info/httpdocs/templates/gk_publisher/html/pagination.php on line 34

              Notice: Undefined offset: 3 in /var/www/vhosts/shan.info/httpdocs/templates/gk_publisher/html/pagination.php on line 34