ftp://ftp.hp.com/pub/softlib2/software1/pubsw-windows/p
2144920481/v67792/hp-esxi5.0uX-bundle-1.1-37.zip
So I ran into a situation where I needed to get the HP CIM providers onto ESXi 5 in order to gain more visibility into the hardware that was running my ESXi 5 install. This is a relatively easy task but I thought I would throw the process I used up here anyways in the case that it might help others. This should apply to other vendors who package their CIM providers as well however for this case I will use the HP Offline Bundle for ESXi as an example.
First off, there are a couple of different ways you can do this. Using the vSphere CLI or utilizing vSphere Update Manager. I initially used the CLI method as I only had one host to do, but for these purposes I will explain both ways. The Update Manager process will most certainly help if you need to deploy these packages to more than one host. Either way, you end up with the same results.
So to start obtain the HP ESXi Offline Bundle from HP's website. Simply find your model of server and it should be listed in the Drivers and Software section under VMware vSphere 5.
Using the CLI
First off you will need to copy the bundle from HP locally onto the ESXi server. There are a few ways to do this. You can utilize a program such as WinSCP to connect and transfer the file (you will need to enable SSH on the host) or you could simply upload this to a datastore that the host has access to using the Datastore Browser. Either or, just get it on the host.
Once it's on the host it's a matter of using Putty to ssh into your host or connecting directly to the DCUI and launching the ESXi Shell and running the following command…
esxcli software vib install -d path_to_bundle.zip
If you are using a remote CLI installation then you need to add a few options to provide the server and credentials as follows
esxcli -s SERVERNAME -u root -p Password software vib install -d path_to_bundle.zip
Once this command executes it should delve into the zip file and install the packages that are applicable to your host. Once completed you will need to reboot your host.
Using VMware vSphere Update Manager
Using Update Manager takes a little longer to setup but will save you time in the long run if you need to apply a package or patch on a large scale. The process to getting the bundles on your hosts is two-fold. First we need to update the patch and create a baseline and then simply attach that baseline, scan, and remediate our host just as we always have for the standard ESXi patches.

So first off we need to be in the Administration View of Update Manager. This can be accessed by either clicking the 'Update manager' icon under the Solutions and Appliances section of the Home screen or by selecting 'Admin View' while on the Update Manager tab. Once in Admin View we have a couple of tasks to perform; we need to upload our new patch and then create a baseline containing it.

Navigate to the Patch Repository tab and click 'Import Patches' in the top right corner. The remainder of this process is quite simple. Browse to the zip file containing the patches and upload the file. Once uploaded you should see your patch in the list (it will be bolded).

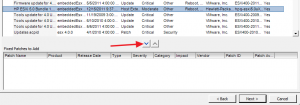
Now we need to navigate to the Baselines and Groups tab to create our baseline. Right-click in some white space on the Baselines and Groups tab and select 'New Baseline'. Give your baseline a name and a description and select 'Host Patch' as the Baseline Type. On the next screen we are going to want to select 'Fixed' as our Patch Option as this baseline is only going to contain one patch and it is never going to change. Now we should be on the step where we need to select our patches to add to the baseline. Find your newly uploaded patch and click the down arrow to add it to the baseline. Once completed click 'Finish'.
So now that we have a baseline created containing our patch that we want installed, the process of getting it on to the hosts should be quite familiar if you are using Update Manager in your environment. Simply attach your new baseline to the host, Scan it, and Remediate.
google hp-esxi5.0uX-bundle
http://h20000.www2.hp.com/bizsupport/TechSupport/SoftwareDescription.jsp?lang=en&;;cc=us&prodTypeId=15351&prodSeriesId=4091412
&prodNameId=4091432&swEnvOID=4115&swLang=8&mode=2&taskId=135&swItem=MTX-bd57017082334cdf81684ab39d


