合并字典删除重复行
- Published in reaver
- May 30, 2013
. F5 K* K2 s1 I ` @
) o/ j6 D% k. B0 x, T
# u( b O0 b4 s0 w7 | - R* `5 L) q! I( E% [
. F5 K* K2 s1 I ` @
) o/ j6 D% k. B0 x, T
# u( b O0 b4 s0 w7 | - R* `5 L) q! I( E% [
httpd: Could not reliably determine the server's fully qualified domain name, using 127.0.0.1 for ServerName
解决办法非常简单:
#vim /web/apache/conf/httpd.conf (在这里/web/apahce是我安装apache的目录,你默认安装的话应该是/usr/local/apache2/icons)
找到#ServerName www.example.com:80 把#去掉,再重启apache即可没事了。
现象:
這個問題應該是沒有在 /etc/httpd/conf/httpd.conf 中設定 ServerName
最简单的,修改httpd.conf文件,增加:
ServerName www.example.com:80
我的改为:
再次启动就正常了!
------------------------------------------------------------------------------------------------------------------------------------------------------------
AH00558: httpd: Could not reliably determine the server's fully qualified domain name, using localhost.localdomain. Set the 'ServerName' directive globally to suppress this message
httpd (pid 7907) already running
修改:去掉注释即可。
# If your host doesn't have a registered DNS name, enter its IP address here.
#
ServerName www.example.com:8080
解决方案:
进入apache的安装目录:
Windows : D:\Program Files\Apache Software Foundation\Apache2.2\conf
linux : /usr/local/apache/conf
用记事本打开httpd.conf
将里面的#ServerName localhost:80注释去掉即可。
再执行httpd
然后可以通过浏览器访问http://localhost:80,如果页面显示“It works!”,即表示apache已安装并启动成功。
错误:[warn] NameVirtualHost *:80 has no VirtualHosts
原因:定义了多个NameVirtualHost
解决:Ubuntu之前的版本定义在/etc/apache2/sites-available/default, 8.04后在/etc/apache2/ports.conf
故可以将/etc/apache2/ports.conf中的NameVirtualHost *:80注释掉
这个问题的本质是在没有定义域名是一个端口只能对应一个虚拟主机,将NameVirtualHost *:80改为其他端口也可以解决
如果有多个不同的域名的话,用同样的端口也可以
为什么要使用ntpd而不是ntpdate?
原因很简单,ntpd是步进式的逐渐调整时间,而ntpdate是断点更新,比如现在服务器时间是9.18分,而标准时间是9.28分,ntpd会在一段时间内逐渐的把时间校准到与标准时间相同,而ntpdate会立刻把时间调整到9.28分,如果你往数据库内写入内容或在其他对时间有严格要求的生产环境下,产生的后果会是很严重的。(注:当本地时间与标准时间相差30分钟以上是ntpd会停止工作)
1.首先主机启动NTP。
2.客户端会向NTP服务器发送调整时间的message。
3.然后NTP server会送出当前的标准时间给client
4.client接受来自server的时间后,会根据这个信息来调整自己的时间。这样就实现了网络对时。
NTP这个deamon采用了123端口。(UDP)
“当我们要利用Tim server来进行实践的同步更新时,就需要使用NTP软件提供的ntpdate来连接端口123”
1./etc/ntp.conf
linux各版本虽然目录不同,但文件名相同。可以用which ntp.conf 或者locate ntp.conf来查找。这是NTP唯一的一个设置文件。
2./usr/share/zoneinfo/
这个里面规定了这个主要时区的时间设置文件。
3./etc/sysconfig/clock
这个文件是linux的主要时区设置文件,每次开机后linux会自动读取这个文件来设置系统所默认的显示时间,可以看看它里面到底设置了什么:
cat /etc/sysconfig/clock
# The ZONE parameter is only evaluated by system-config-date.
# The timezone of the system is defined by the contents of /etc/localtime.
ZONE="Asia/Shanghai"
UTC=true
ARC=false
4./etc/localtime
本地端时间配置文件。
5./bin/date
这个是时间的修改命令,除了输出时间,还可以修改时间。
6./sbin/hwclock
因为linux系统上面BIOS时间与linux系统时间是分开的,所以使用date这个指令调整了时间之后,还需要使用hwclock才能将修改过的时间写入BIOS中。
7./usr/sbin/ntpd
这是NTP的daemon文件,需要启动它才能提供NTP服务,这个命令会读取/etc/ntp.conf里面的设置。
8./usr/sbin/ntpdate
这是client用来连接NTP Server的主要执行文件,如果您不想启用NTP,只想启用NTP Client功能的话,可以只应用此命令。
9,/usr/sbin/ntptrace
可以用来追踪某台时间服务器的时间对应关系。
1、设置时区
cp /usr/share/zoneinfo/Asia/Shanghai /etc/localtime
2、安装ntpd服务
yum -y install ntp
3、配置ntpd
vi /etc/ntp.conf
restrict default kod nomodify notrap nopeer noquery   #
restrict -6 default kod nomodify notrap nopeer noquery  #针对ipv6设置

# 允许本地所有操作
restrict 127.0.0.1
restrict -6 ::1

# 允许的局域网络段或单独ip
restrict 10.0.0.0 mask 255.0.0.0 nomodify motrap
restrict 192.168.0.0 mask 255.255.255.0 nomodify motrap
restrict 192.168.1.123 mask 255.255.255.255 nomodify motrap

# 使用上层的internet ntp服务器
restrict cn.pool.ntp.org
restrict 1.cn.poo.ntp.org
restrict 0.asia.pool.ntp.org
restrict 3.asia.pool.ntp.org

server cn.pool.ntp.org prefer
server 1.cn.poo.ntp.org
server 0.asia.pool.ntp.org
server 3.asia.pool.ntp.org

# 如果无法与上层ntp server通信以本地时间为标准时间
server   127.127.1.0    # local clock
fudge    127.127.1.0 stratum 10

# 计算本ntp server 与上层ntpserver的频率误差
driftfile /var/lib/ntp/drift

# Key file containing the keys and key identifiers used when operating
# with symmetric key cryptography.
keys /etc/ntp/keys
#日志文件
logfile /var/log/ntp.log
修改/etc/sysconfig/ntpd:
# Drop root to id 'ntp:ntp' by default.
OPTIONS="-u ntp:ntp -p /var/run/ntpd.pid"

# Set to 'yes' to sync hw clock after successful ntpdate
SYNC_HWCLOCK=yes #make no into yes; BIOS的时间也会跟着修改

# Additional options for ntpdate
NTPDATE_OPTIONS=""
运行ntp
service ntpd start/stop/restart
查看ntp的端口
应该看到123端口
netstat -unlnp
查看ntp服务器有无和上层连通
# ntpstat
synchronised to NTP server () at stratum 2
time correct to within 74 ms
polling server every 128 s
注意:此命令出现上述synchronised结果比较慢,我的用了大概5分钟。
查看ntp服务器与上层间的联系
# ntptrace -n 127.0.0.1
127.0.0.1: stratum 3, offset -0.001095, synch distance 0.532610
116.193.83.174: timed out, nothing received
查看ntp服务器与上层ntp服务器的状态
# ntpq -p
其中:
remote - 本机和上层ntp的ip或主机名,“+”表示优先,“*”表示次优先
refid - 参考上一层ntp主机地址
st - stratum阶层
when - 多少秒前曾经同步过时间
poll - 下次更新在多少秒后
reach - 已经向上层ntp服务器要求更新的次数
delay - 网络延迟
offset - 时间补偿
jitter - 系统时间与bios时间差
如果所有远程服务器的jitter值是4000并且delay和reach的值是0,那么说明时间同步是有问题的
可能的原因是防火墙阻断了与server之间的通讯,即123端口是否正常开放;
此外每次重启NTP服务器之后大约要3-5分钟客户端才能与server建立正常的通讯连接,否则你在客户端执行“ntpdate 服务器ip”的时候将返回:
27 Jun 10:20:17 ntpdate[21920]: no server suitable for synchronization found
我采用了一个很笨的办法来手动启动ntpd,而不是把ntpd加入服务,写一个简单的脚本
vi ntpstart.sh
ntpdate cn.pool.ntp.org
ntpdate cn.pool.ntp.org
service ntpd start
然后加入/etc/rc.local
/shpath/ntpstart.sh
这是因为我有一台服务器启动后的时间总是与标准时间差别很大,每次启动后ntpd要花很多时间才能把时间校准,所以我是先在系统启动后ntpdate更新两次,然后再启动ntpd服务,在freebsd里好像有修改配置文件,让时间服务器在系统启动之前启动的,centos还没仔细琢磨
方法1.使用ntpdate与上面配置的时间服务器定时同步,不推荐此方法
方法2.安装ntpd,指定时间server为上面配置的服务器地址,推荐
更详细的介绍参见台湾 鸟哥的Linux私房菜
中国国家授时中心(陕西西安) 210.72.145.44
上海: 61.129.66.79 (t2.hshh.org) 61.129.42.44 (ntp.fudan.edu.cn) 202.120.2.101 (ntp.sjtu.edu.cn)
浙江 218.75.4.130 (t1.hshh.org)
内蒙古 218.21.130.42 (t1.hshh.org)
香港: 137.189.11.66 (clock.cuhk.edu.hk ) 137.189.11.128 (ntp.cuhk.edu.hk )
台湾: 220.130.158.52(time.stdtime.gov.tw) 220.130.158.72(Clock.stdtime.gov.tw)
220.130.158.51(tick.stdtime.gov.tw) 220.130.158.54(watch.stdtime.gov.tw)
asia.pool.ntp.org, 更多亚洲服务器请参考 http://www.pool.ntp.org/zone/asia
cn.pool.ntp.org, 更多中国服务器请参考 http://www.pool.ntp.org/zone/cn
tw.pool.ntp.org, 更多中国台湾服务器请参考 http://www.pool.ntp.org/zone/tw
hk.pool.ntp.org, 更多中国香港服务器请参考 http://www.pool.ntp.org/zone/hk
12/02/15补充:
取消ntpd自动启动,在系统启动时,指定ntpdate远程标准时间服务器两次,然后service ntpd start
好像也可以修改rc.conf或者加上一堆什么参数来实现,我偷懒用这个笨办法来保证时间的准确了
http://www.crsay.com/wiki/wiki.php/server/centos/ntp-set
1、下载量产工具(本帖提供绿色中文版下载)解压,展开工具目录。
2、运行InfUpdate工具输入VID&PID号,点击ADD加入后关闭窗口。
3、运行DtMPTool.exe出现量产工具主界面,见下图: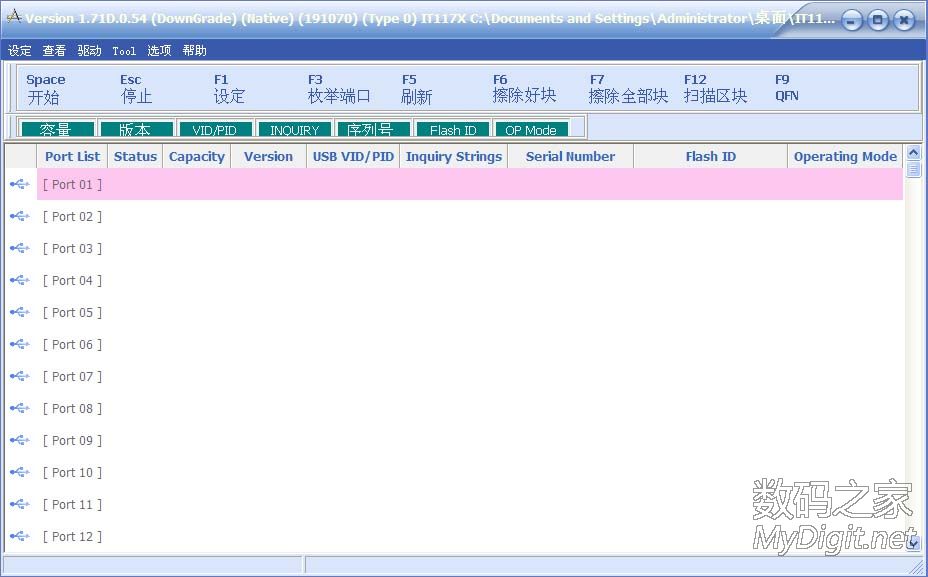
4、插入U盘后工具会辨认出U盘,如果没发现U盘,请点击“刷新”或“枚举端口”就能找到U盘,见下图: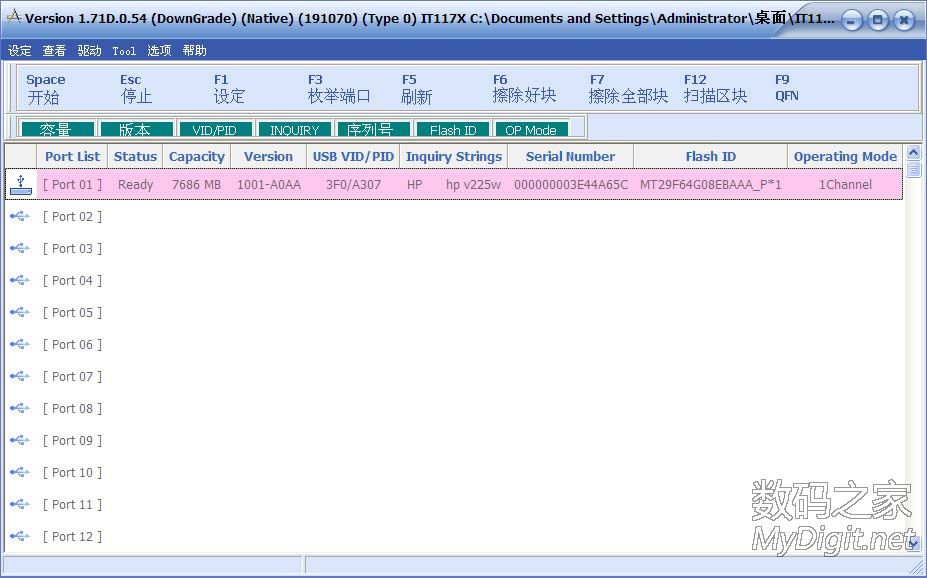
5、点击“设置”输入密码123后点击“确定”出现参数设置界面。
A、“厂商信息”页面设置如下图: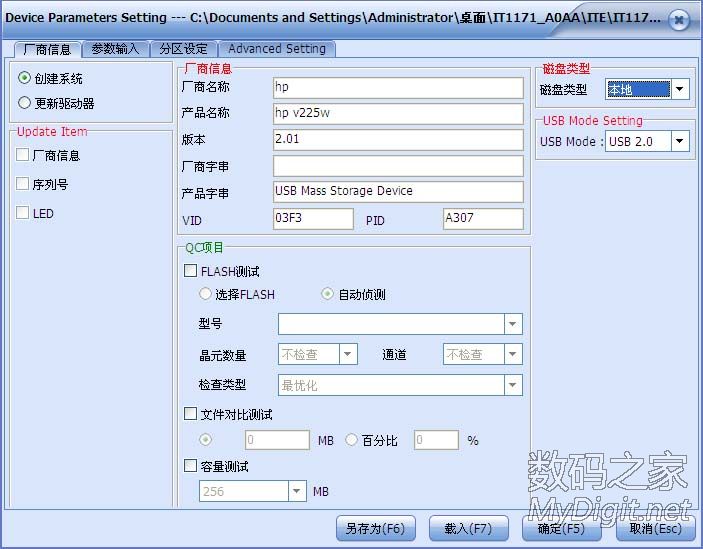
“厂商信息”栏参数除VID&PID外可随意修改,VID&PID最好别改,若你执意要改则应按十六进制规范填写。“QC项目”栏选“自动侦测”,“磁盘类型”栏可选自己喜欢的,“可除去的”为ZIP,“本地”为HDD。
B、“参数输入”页面可按下图设置: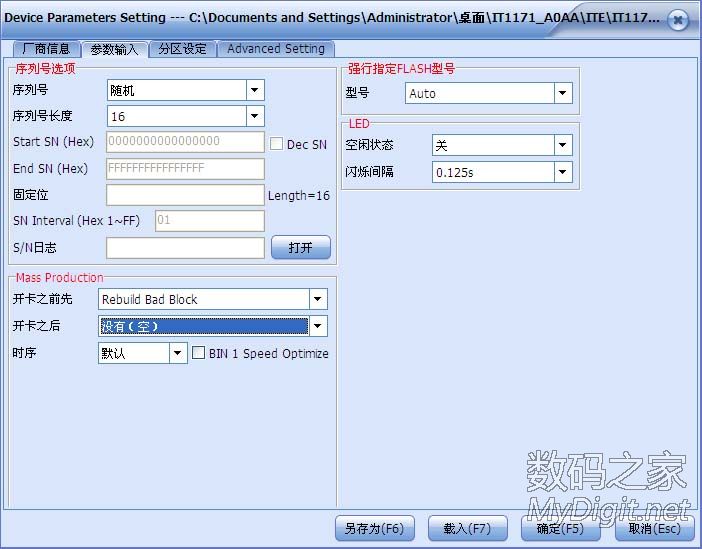
可以选择自己喜欢的序列号,选“本地”项后就可以输入序列号。第一次量产时“mass production”栏的“开卡之前”项应选“Rebuild Bad Block”模式,因为量产工具对第一次量产的U盘要进行坏块标注,否则量产会失败。因该模式必须扫描整个U盘,所以花费的时间较长,请耐心等待。再次量产时可选“正常”以便节省时间。“开卡之后”项选“没有”。
C、“分区设置”页面设置如下图: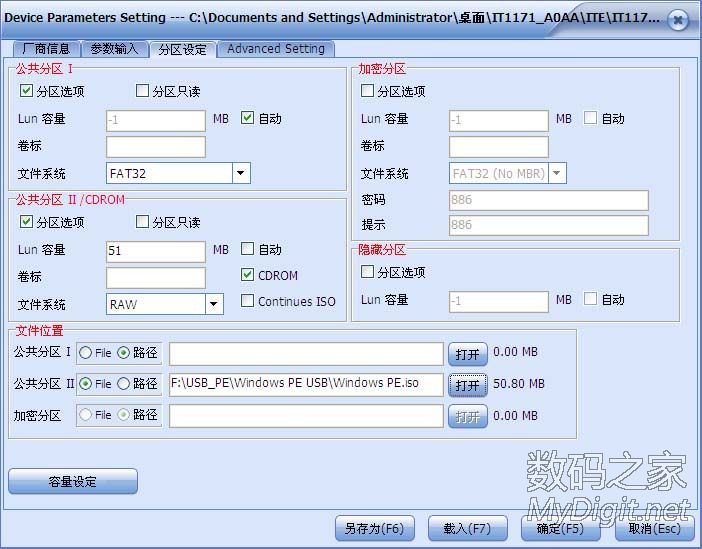
勾选“公共分区I”和“公共分区II”的“分区选项”,“公共分区I”容量大小选“自动”。请注意:量产CDROM时“文件位置”栏的“公共分区II”项应点选“File”,调入镜像时有两种格式可供选择(dgo&iso)。“加密分区”&“隐藏分区”本人认为没有太大的意义,读者可自行研究。
设置好后点击“确定”按钮保存配置文件退出,点击“开始”按钮开始量产。量产成功时会出现下图: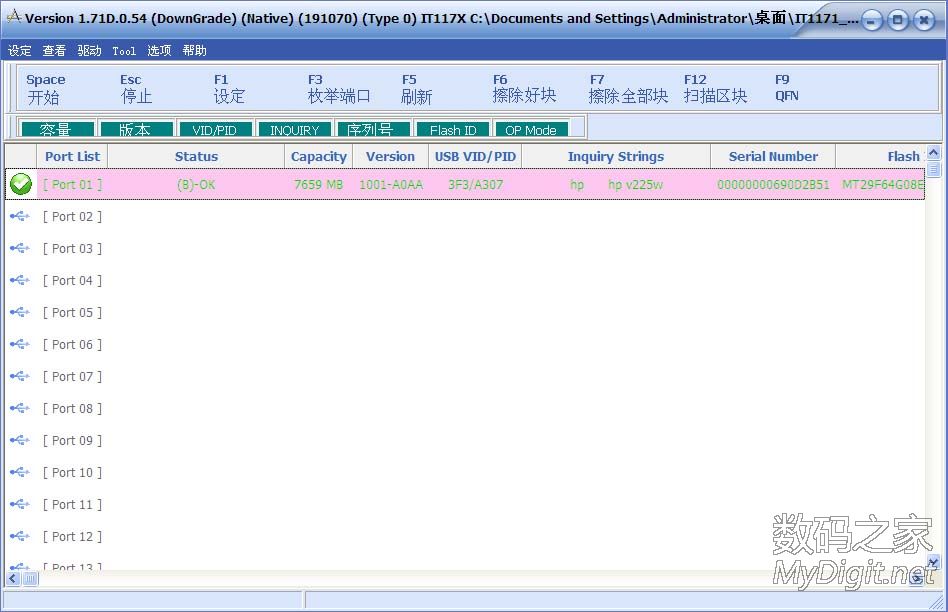
关闭主界面,拔插U盘后在“我的电脑”里就可以见到刚才量产的USBROM和U盘分区了,见下图: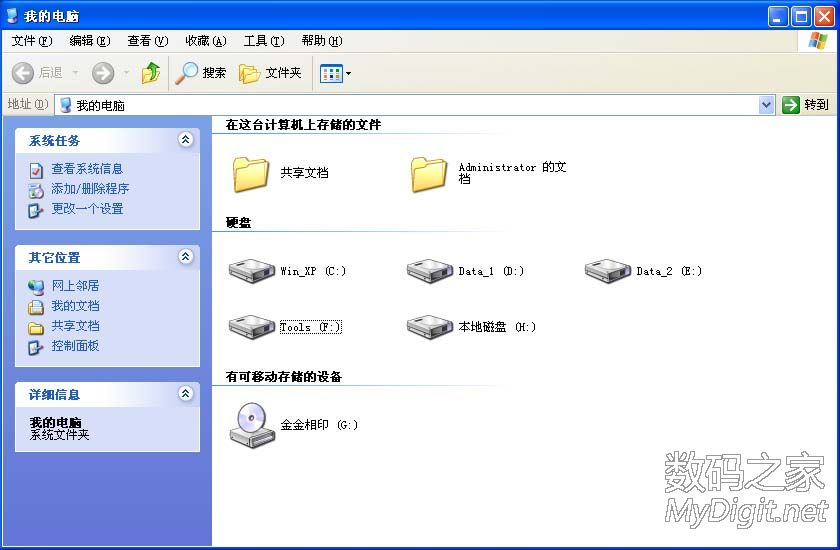
6、注意事项
A、如果量产失败,请双击鲜红色横条打开“出错信息表”,可根据出错信息对设置参数进行调整。
B、量产成功后有可能会出现找不到U盘分区的情况,这时可右击“我的电脑”点“管理”打开“磁盘管理”后重建U盘分区即可。
C、想量产CDROM时,为提高U盘性能,量产前先用本帖提供的“一键4K扇区对齐”工具优化U盘,因为CDROM的只读特性,量产后再优化时对提高性能没有帮助。
D、如果多次量产都失败时,请使用本帖提供的检测工具检测你的U盘,看看U盘的Flash型号在量产工具的Flash列表中有没有,如果没有就不要再浪费时间了,等待更新版本的量产工具吧。
E、本帖提供的量产工具为绿色中文版,适合联阳的IT-1167~1171等主控U盘。
F、因该U盘的工作电流较大,量产时请不要使用USB延长线,最好使用背面端口。
要在 xp 下 量产
不要使用win7
thinkpad上不能启动并不是量产引起的.
是由于盘符造成的.
thinkpad bios只能认第一个盘符为cdrom, 但是量产不支持.
所以有个办法就是之量产为一个光驱, 不要u盘.
thinkpad就能正常使用了.
http://www.mydigit.net/read.php?tid=53131&fpage=0&toread=&page=1
---------------------------------------------------------------------------------------------------------
本方法是自残U盘,因此姑且称之为“葵花大法”,以临时解决UT165无法从我的ThinkPad上以USB-CDROM启动的问题。
UT165主控U盘(我的Kingmax超棒4G就是)利用量产工具1.65.11.10(其他版本也相似,包括UFD Utility)可成功制作 1个可移动磁盘分区 + 1个CDROM ,注意这个CDROM分区总是在U盘移动磁盘分区之后!
这样问题来了,在我的T43、T60两台笔记本上均无法从 USB-CDROM启动,系统BIOS均只能识别第一个USB-HDD分区——可移动磁盘分区。同样的问题也在Dell台式机(OPTIPLEX 330)上发生。这个问题很恼火,大多数量产成功但无法从 USB-CDROM启动的问题都是由此。
而在另两个U盘:金士顿U盘(主控SSS6677)和宇瞻AH320(主控UP13)则不存在以上问题,原因很简单,这两个U盘量产后 CDROM分区均位于第一个分区,只要电脑BIOS支持USB-CDROM启动,都能顺利从U盘CDROM分区启动。
偶然从论坛上发现UT165量产工具打开隐藏功能的方法,发现一个有趣的选项:“OneDisk Autorun”,从字面上理解,是产生一个可自动运行的磁盘,如选中该选项,则“Public Area I(LUN 0)”成不可选状态,且有一行文字说明:“Minimum size can be zero if Hidden Block or Security Area is not 0 MB”——即Public Area I分区可在Hidden Block或Security Area不为0MB的情况下为0!(有点绕口哦,简单说就是——Hidden Block或Security Area不为0MB的情况下,可以没有Public Area I 分区! )
分析一下:
Hidden Block——隐藏区域,应该是将U盘的部份区域隐藏不用。如果要将你的4G U盘变成1G,就用它隐藏3个G好了。除了我这样的冤大头恐怕没人会干 。
Security Area——应该是加密分区,还可设置登录密码及密码提示。——但我至今也没搞懂怎么用,即便设置了,如何访问呢?系统中不可见,也没有相应的登录软件入口,不知用UFD Utility能否登录?没试过。
回到主题,我的情况是要将CDROM分区放到第一,但量产工具无法做到,那就考虑将非CDROM分区去除,使系统只能认CDROM分区!自残就自残吧,U盘是拿来用的,要用到U盘正常功能再量产回去。
动手: 使用量产工具1.65.11.10
1. 右键双击Partition Setting选项卡右侧空白区域,打开隐藏选项。
2. 勾选“Enable OneDisk Autorun”,软件自动选中“Security Area”和“Autorun Area”的分区设置。
3. “Image File Location”处选择ISO,我的是老毛桃911,软件自动给出分区容量110M。
4. 关键的一步:Hidden Block Partiton 设置容量:1 MB。——其实设置多少无所谓,反正你也用不到了,只要在1以上,总容量-ISO容量以内就行。Security Area就让它Auto。
5. OK,设置完毕。
6. 开始量产 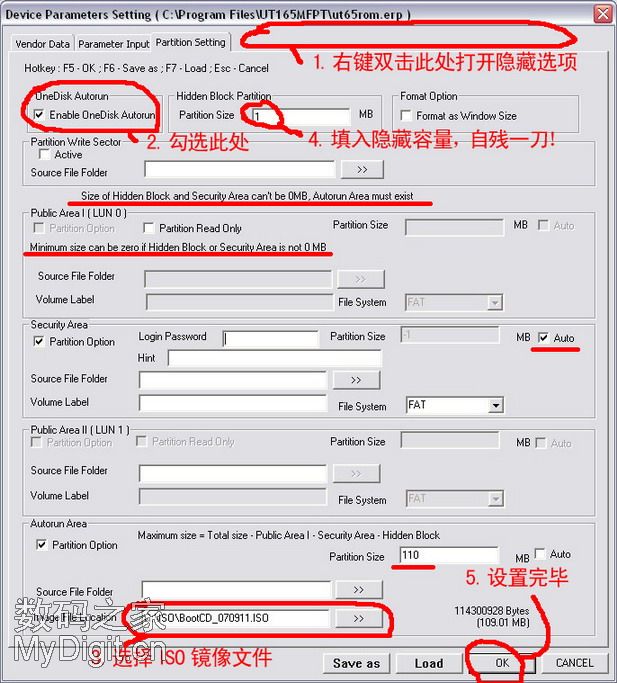
量产完毕后,再插入U盘时,系统只认出一个CDROM,OK!
启动我的T60,BIOS终于识别出我的USB-CDROM,继续,进入老毛桃PE,意外发生了,PE是进去了,但没有加载外置程序,而ISO没问题,在SSS6677的金士顿上是正常的啊?
经过对WinPE的一夜分析,baidu、google,终于找到问题,是PE的配置文件没有正常加载,看来,UT165和SSS6677就是不一样,(后又试了AH320,UP13居然也没有加载PE的外置程序),经修改PE配置文件后(——以后有空再单独发帖说明吧,大多数U盘CD分区PE不加载外置都是这个原因),我的Kingmax超棒终于能以USB-CDROM启动ThinkPad进入老毛桃911了。
后记,该方法应该对所有支持USB-CDROM启动的计算机都有效,兼容性是大大提高了,但U盘的移动存储功能也就为0了。此法只能是急需USB-CDROM启动功能的UT165用户使用(UT163是否需要不清楚),其他主控仅供参考了,关键看各位是否需要挥刀自残。
敲字很累,论坛老大也提供了这个办法,但偷懒没说详细,给点辛苦费吧!
lsof 工具可列出某个Unix 进程所打开文件信息的清单,被打开文件的类型可能包括了:本地文件,目录,网络共享文件,块设备文件,字符设备文件,共享库,管道,软链接,套接字等等.
以下是具体的lsof 操作实例总结:
1,列出所有被打开文件信息
#lsof
2,查看某个被打开文件信息
#lsof /path/to/file
#lsof /path/to/file1 /path/to/file2
3,列出某个目录下的被打开文件
#lsof +D /path
#lsof | grep “/path”
4,列出某个用户下的被打开文件
#lsof -u nobody
#lsof -u nobody,root
5,列出某个进程下的被打开文件
#lsof -c httpd
#lsof -c httpd -c mysqld
6,复合查询(OR)被打开文件信息
#lsof -u nobody -c httpd
7,复合查询(AND)被打开文件信息
#lsof -a -u root -c httpd
8,查看除root之外所有用户的被打开文件
#lsof -u ^root
9,查看具体进程PID的被打开文件
#lsof -p 10101
#lsof -p 10101,10102,10103
10,列出所有网络连接
#lsof -i
11,列出所有网络TCP或者UDP连接
#lsof -i tcp
#lsof -i udp
12,查看具体网络端口信息
#lsof -i :80
#lsof -i tcp:80
#lsof -i udp:53
13,查看具体用户下所有网络连接
#lsof -a -u www -i
14,列出NFS 文件
#lsof -N
15,列出Unix 套接字文件
#lsof -U
16,列出某个特定文件描述符相关联的文件
#lsof -d 2
#lsof -d 0-2
#lsof -d mem
0 1 2 => FD: standard input, output, and error
17,列出所有网络连接关联的PID
#lsof -t -i
#kill -9 `lsof -t -i` => kill all process use network
18,重复lsof 输出
#lsof -r 1 -a -u www -i
130522 1:45:20 [ERROR] /usr/libexec/mysqld: Can't open file: './alamise/alamise_categories.frm' (errno: 24)
-----------------------------------------------------------------
ps -ef|grep mysql
查看 pid
pid 32150
---------------------------------------------------------------------
cat /proc/32150/limits |grep files
查看pid最大limite
-------------------------------------------------
lsof -p 32150 |wc -l
查看已经打开的数量
lsof | grep mysqld
查看列表
-----------------------------------------------------------
查看 mysql值
mysql -uUser -pPASS
show global variables like "%open_files_limit%";
-------------------------------------
修复表
mysqlcheck -A -o -r -p
password
----------------------------------------
更改
/etc/my.cnf
[mysqld]
open_files_limit = 100000